
Some notes on how to paint a simple watercolour painting featuring some misty background fir trees.
What follows was featured at my painting class in Barnoldswick Library on Monday. I did a bit of an instruction sheet to compliment the painting and given its reception I thought it might be a good idea to put it on here, albeit in a deconstructed form, for people to access. It also gives a bit of an insight into what goes into a painting class.
First of all came the concept art work. Done when planning the class and sketched quickly on cartridge paper. I like working in watercolour on A4 cartridge (of all sorts of weight) as it encourages bold quick paintings and the initial drawing is easy to copy on my scanner.
Concept Artwork on Cartridge Paper
The original material for this painting came from some reference photographs taken in SW Scotland in the Galloway Forest. What I was looking for was some nice fir trees with a bit of a road which would lead the eye a bit into the painting and provide scope for people to practice fir trees while resulting in a pleasing painting at the end of the day.
I then made up a help sheet which was photocopied and given out in class as an aid as well as relevant reference material.
The Painting
Materials are Watercolour Paper (Bockingford NOT 140lb), Ultramarine Blue, Burnt Sienna, Cad Yellow, Yellow Ochre and Naples Yellow.
Extra complication – we decided to include Cairnsmore of Fleet in the background in the form of a misty mountain. This made the painting a bit more difficult as everything down to the base of the misty trees needed painting wet into wet in one go so it all needs to be done before the background dries.
In terms of drawing the foreground banking was lightly drawn in and the foreground trees indicated by a single line and the mountain put in just between the trees on the right.
The sky, the mountain and the background trees.
Sky was just done with naples yellow and ultramarine blue after wetting the paper down to the start of the foreground. The mountain was then put in with a thick mix of UB and B Sienna. Then the background trees were put in. All this while the paper is still wet.
The fine print – this is the deconstructed sheet re the misty trees

Step 1 & 2
1 – wet the paper, this is either with a wash or can be just plain water
2 – add tree wet in wet

Step 3 & 4
3 – while still wet add more trees and add definition to some that you have already painted
4 – dab out the mist either with a damp tissue or soft brush
Now you can put in the foreground and do not forget to make things warmer as you get closer to the front of the painting and to make those foreground trees sit down by adding a bit of dark beneath them.
So now the bit of the sheet on the foreground trees

Step 1
1 – decide on the type/shape of tree
easy way to visualise the shape is think of a triangle and add the branches inside
Start off the tree with a single line and build it up from there using a nice blue/green mix
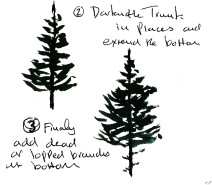
step 2 & 3
2 – Darken the trunk with some very dark brown/neutral mixed from UB & BS and extend the bottom
3 – finally add dead/lopped branches at the bottom of the trees.
Quick and easy fir trees.
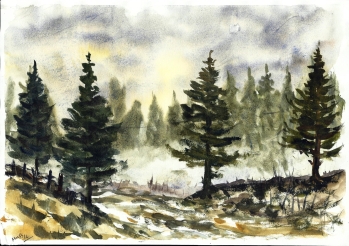
Finished Painting

Misty Galloway Trees
This is the actual painting I painted on Monday as the demo/paint-along about 20 mins.
